业务需求需要对接招行支付,在对接过程中遇到了一个问题,就是招行支付的签名算法是国密算法 SM2,第一次接触这个算法但是对接支付经验丰富的我还是第一时间去找相关的库来完成报文的加签解签。不一会我就找到了相关库sm-crypto.看完文档觉得没啥问题,直接开干.
结果刚开始就遇到了第一个问题,招行提供的开发(测试)环境的公钥是:”MFkwEwYHKoZIzj0CAQYIKoEcz1UBgi0DQgAE6Q+fktsnY9OFP+LpSR5Udbxf5zHCFO0PmOKlFNTxDIGl8jsPbbB/9ET23NV+acSz4FEkzD74sW2iiNVHRLiKHg==” 这个格式看着就跟 sm-crypto 文档里面的公钥格式不一样。但是我一开始没多想,以为这个公钥只不过是做了一个 base64 的编码。于是我就直接把这个公钥进行了 base64 解码,然后把解码后的数据当做公钥传入 sm-crypto 库中的 sm2.doVerifySignature 方法中,结果就报错了。
代码报错: Cannot read properties of null (reading 'multiply') 这个时候就感觉不妙了,因为这是 sm-crypto 中抛出的错误,那么这肯定是我的入参不对导致了这个错误,那究竟是什么入参错了呢,我没有头绪,而且网上的资料也少。于是我只能慢慢试试,然后我就开始对比 base64 解码出来的公钥的数据是什么,首先 Buffer.from(publicKeyBase64, 'base64').toString() 解码出来的数据是一个这样的字符串,”0Y0\x13\x06\x07�H�=\x02\x01\x06\b�\x1C�U\x01�-\x03B\x00\x04�\x0F���’cӅ?��I\x1ETu�_�1�\x14�\x0F��\x14��\f���;\x0Fm�\x7F�D���~iij�Q$�>��m���GD��\x1E”,看到这个我就发现不对劲了,于是尝试将这个字符串重新 toString 成别的格式,最后发现用 Buffer.from(publicKeyBase64, 'base64').toString('hex') 转成16进制才是正确的(结果是 “3059301306072a8648ce3d020106082a811ccf5501822d03420004e90f9f92db2763d3853fe2e9491e5475bc5fe731c214ed0f98e2a514d4f10c81a5f23b0f6db07ff444f6dcd57e69c4b3e05124cc3ef8b16da288d54744b88a1e”),得到的结果才跟文档中的公钥格式类似,但是还是有个问题, 就2个公钥的长度就不同,解码出来的招行公钥长度比标准的公钥长度多了54个长度.
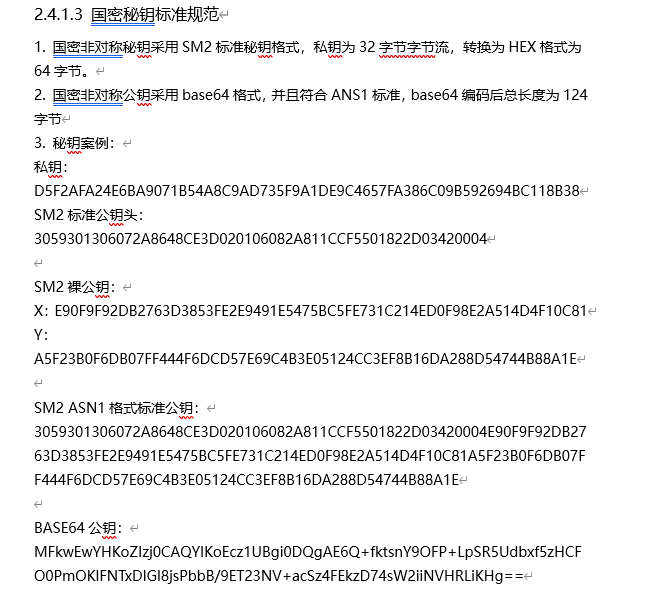
当时还以为招行的公钥是有问题的,翻阅招行提供的对接文档,总算让我发现了问题所在,我发现了招行提供的的公钥的生成方式,其中在头部加上了标准的公钥头, “SM2标准公钥头:3059301306072A8648CE3D020106082A811CCF5501822D03420004” 而这个长度刚好就是 54.

于是我通过Buffer.from(publicKeyBase64, 'base64').toString('hex').substring(54)得到了正确的公钥,但是结果发现还是在报错,尝试了半天,最后我直接翻看了 sm-crypto 源码找错误原因发现了错误一直停留在这个 doVerifySignature 函数里面的这行代码上 const x1y1 = G.multiply(s).add(PA.multiply(t)),最后通过 debug 定位到了最终的出现问题的函数 decodePointHex
1
2
3
4
5
6
7
8
9
10
11
12
13
14
15
16
17
18
19
20
21
22
23
24
25
26
27
28
29
30
31
32
33
34
35
36
37
38
39
40
41
42
43
44
45
46
47
48
49
50
51
52
53
54
55
56
57
58
function doVerifySignature(msg, signHex, publicKey, {der, hash, userId} = {}) {
  let hashHex = typeof msg === 'string' ? _.parseUtf8StringToHex(msg) : _.parseArrayBufferToHex(msg)

  if (hash) {
    // sm3杂凑
    hashHex = doSm3Hash(hashHex, publicKey, userId)
  }

  let r; let
    s
  if (der) {
    const decodeDerObj = decodeDer(signHex)
    r = decodeDerObj.r
    s = decodeDerObj.s
  } else {
    r = new BigInteger(signHex.substring(0, 64), 16)
    s = new BigInteger(signHex.substring(64), 16)
  }

  const PA = curve.decodePointHex(publicKey)
  const e = new BigInteger(hashHex, 16)

  // t = (r + s) mod n
  const t = r.add(s).mod(n)

  if (t.equals(BigInteger.ZERO)) return false

  // x1y1 = s * G + t * PA
  const x1y1 = G.multiply(s).add(PA.multiply(t))

  // R = (e + x1) mod n
  const R = e.add(x1y1.getX().toBigInteger()).mod(n)

  return r.equals(R)
}

decodePointHex(s) {
  switch (parseInt(s.substr(0, 2), 16)) {
    // 第一个字节
    case 0:
      return this.infinity
    case 2:
    case 3:
      // 不支持的压缩方式
      return null
    case 4:
    case 6:
    case 7:
      const len = (s.length - 2) / 2
      const xHex = s.substr(2, len)
      const yHex = s.substr(len + 2, len)

      return new ECPointFp(this, this.fromBigInteger(new BigInteger(xHex, 16)), this.fromBigInteger(new BigInteger(yHex, 16)))
    default:
      // 不支持
      return null
  }
}
这个函数会截取公钥的前两位做一些操作,如果前两位不会返回 ECPointFp 对象也就会抛出我遇到的那个错误.在结合 sm-crypto 的文档以及这个 issue 最后我尝试 '04' + Buffer.from(publicKeyBase64, 'base64').toString('hex').substring(54) 这个方式最终拿到了正确的公钥,就可以正常的进行验签了。当然加签和验签的时候遇到的通用问题就是加签解签的数据的编码格式,这个看文章末尾的代码就知道怎么处理了。
最后分享下最终的加解签代码
1
2
3
4
5
6
7
8
9
10
11
12
13
14
15
16
17
18
19
20
21
22
23
24
25
26
27
28
29
30
31
32
33
34
35
36
37
38
39
40
41
42
43
import crypto from 'crypto';
import { sm2 } from 'sm-crypto';
class CMBPay {
  private cmbPublicKeyBase64 ='MFkwEwYHKoZIzj0CAQYIKoEcz1UBgi0DQgAE6Q+fktsnY9OFP+LpSR5Udbxf5zHCFO0PmOKlFNTxDIGl8jsPbbB/9ET23NV+acSz4FEkzD74sW2iiNVHRLiKHg==' // 招行公钥base64编码
  private cmbPublicKey: string // 招行公钥
  constructor() {
    this.cmbPublicKey = this.getPublicKey(this.cmbPublicKeyBase64);
  }

  private getPublicKey(publicKeyBase64: string): string {
    return '04' + Buffer.from(publicKeyBase64, 'base64').toString('hex').substring(54);
  }

  private getConcatMsg(obj: Record<string, unknown>): string {
    const keyAry = Object.keys(obj).sort();
    const concatMsg = keyAry.reduce((pre, cur) => `${pre}${cur}=${obj[cur]}&`, '');
    return concatMsg.substring(0, concatMsg.length - 1);
  }

  // 获取签名的md5
  private getSignatureMd5(obj: Record<string, unknown>): string {
    const msg = this.getConcatMsg(obj);
    const hash = crypto.createHash('md5');
    hash.update(msg);
    const signatureMd5 = hash.digest('hex');
    return signatureMd5;
  }

  // 加签
  doSignature(obj: Record<string, unknown>): string {
    const msg = this.getConcatMsg(obj);
    const hexSign = sm2.doSignature(msg, this.privateKey, { hash: true, der: true });
    const sign = Buffer.from(hexSign, 'hex').toString('base64');
    return sign;
  }

  // 解签
  doVerifySignature(obj: Record<string, unknown>, sign: string): boolean {
    const msg = this.getConcatMsg(obj);
    const validateResult = sm2.doVerifySignature(msg, Buffer.from(sign, 'base64').toString('hex'), this.cmbPublicKey, { hash: true, der: true });
    return validateResult;
  }
}