1.Virtual DOM
简单说下我对于 Virtual DOM的理解.顾名思义就是虚拟DOM,其实就是在内存中表示的DOM树.那如何在内存中表示DOM树呢,很简单使用一个JSON对象,通过不断在children属性中加入一个个类似的JSON对象,这样就能在内存构建出一棵虚拟的DOM树.
1
2
3
4
5
6
7
8
{
 tagName: 'div',  // 标签名
 properties: { // 属性
  style: {}  // 样式
 },
 children: [], // 子节点
 key: 1  // 唯一标识
}
再说下我对于JSX的理解,JSX其实只是语法糖,语法糖只是方便我们去写代码,和维护可阅读性.JSX就可以让我们JS代码和React组件嵌套在一起使用.比如下面这个简单的JSX例子,而这背后的逻辑是React的createElement方法在帮我们干活.
1
2
3
4
5
6
7
8
9
// 所写的JSX代码
const app = <Nav color="blue"><Profile>click</Profile></Nav>;

// 实际上的代码
const app = React.createElement(
 Nav,
 {color:"blue"},
 React.createElement(Profile, null, "click")
);
2.React 的生命周期
从16.8.0 版本开始,React官方推出了React Hooks的特性,个人使用起来虽然很灵活.但是一个人写代码有点像闭门造车(刚在2月初完成了创业项目的演示demo使用的就是React Hooks)因为很多地方感觉应该有更好的写法,但是我却因为经验太少,没有找到更好的写法.所以还是回来研究下使用的更加熟练的Class组件的写法.
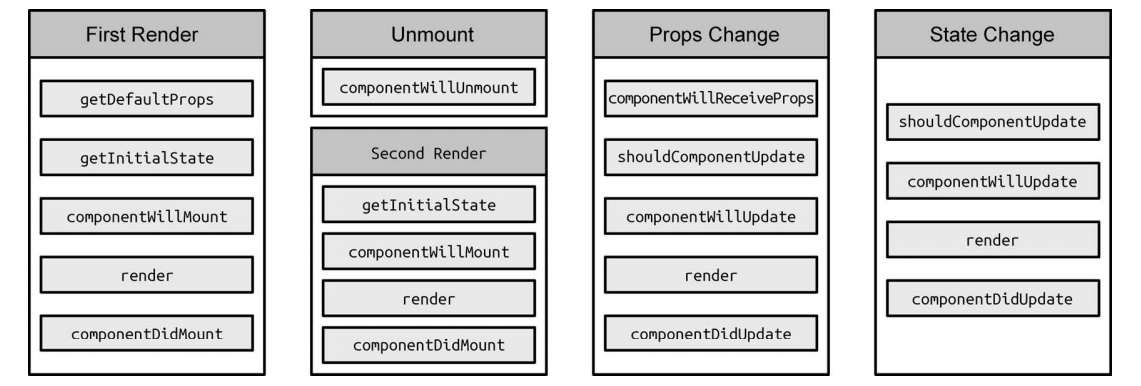
深入React技术栈这本书所讲的React的版本应该是16.4之前的,所以这里只聊的是老版本的生命周期(新版本周期图)因为在16.4版本componentWillMount, componentWillReceiveProps, componentWillUpdate这三个生命周期函数官方不再推荐使用了,官网文档说会在v17版本中废弃.所以如果使用的话控制台会输出一些警告,解决办法是在这些函数名前面加上UNSAFE_前缀.
- 当首次挂载组件时,按顺序执行 getDefaultProps、getInitialState、componentWillMount、render 和 componentDidMount
- 当卸载组件时,执行 componentWillUnmount
- 当重新挂载组件时,此时按顺序执行 getInitialState、componentWillMount、render 和 componentDidMount,但并不执行 getDefaultProps
- 当再次渲染组件时,组件接受到更新状态,此时按顺序执行 componentWillReceiveProps、shouldComponentUpdate、componentWillUpdate、render 和 componentDidUpdate

生命周期可以概括为三个阶段(篇幅限制就不贴源码了)
挂载阶段
挂载阶段的时候由 mountComponent 来负责管理生命周期中的 getInitialState、componentWillMount、render 和componentDidMount.
由于 getDefaultProps 是通过构造函数进行管理的,所以 getDefaultProps只执行一次,也是整个生命周期中最先开始执行的.
getInitialState 获取初始化state、初始化更新队列和更新状态.
若如果组件中定义了 componentWillMount,则执行.此时在 componentWillMount 中调用 setState 方法,是不会触发 re-render的,而是会进行 state 合并,且inst.state = this._processPendingState(inst.props, inst.context)是在 componentWillMount 之后执行的,因此 componentWillMount 中的 this.state 并不是最新的,在 render 中才可以获取更新后的 this.state.
因此,React 是利用更新队列 this._pendingStateQueue 以及更新状态 this._pendingReplaceState 和 this._pendingForceUpdate 来实现 setState 的异步更新机制(我认为有的时候也是同步更新).当渲染完成后,如果组件中定义了 componentDidMount,则调用.
mountComponent 本质上是通过递归渲染内容的,由于递归的特性,父组件的componentWillMount 在其子组件的 componentWillMount 之前调用,而父组件的 componentDidMount在其子组件的 componentDidMount 之后调用.运行阶段
运行阶段的时候由 updateComponent 来负责管理生命周期中的 componentWillReceiveProps、shouldComponentUpdate、componentWillUpdate、render 和 componentDidUpdate.
首先通过前后元素类型是否一致来判断是非需要更新组件.
若如果组件中定义了 componentWillReceiveProps,则执行.此时在 componentWillReceiveProps 中调用 setState,是不会触发 re-render 的,而是会进行 state 合并.且在 componentWillReceiveProps、shouldComponentUpdate 和 componentWillUpdate 中也还是无法获取到更新后的 this.state,即此时访问的 this.state 仍然是未更新的数据,需要设置 inst.state = nextState 后才可以,因此只有在 render 和 componentDidUpdate 中才能获取到更新后的 this.state.
然后还需要调用 shouldComponentUpdate(var shouldUpdate = this._pendingForceUpdate || !inst.shouldComponentUpdate || inst.shouldComponentUpdate(nextProps, nextState, nextContext);) 判断是否需要进行组件更新,如果组件中定义了 componentWillUpdate 则执行.
updateComponent 本质上也是通过递归渲染内容的,由于递归的特性,父组件的 componentWillUpdate 是在其子组件的 componentWillUpdate 之前调用的,而父组件的 componentDidUpdate 也是在其子组件的 componentDidUpdate 之后调用的.卸载阶段
卸载阶段的时候由 unmountComponent 来负责管理生命周期中的 componentWillUnmount.
卸载阶段比较简单,如果组件中定义了 componentWillUnmount,则执行并重置所有相关参数、更新队列以及更新状态,此时在 componentWillUnmount 中调用 setState,是不会触发 re-render 的,这是因为所有更新队列和更新状态都被重置为 null,并清除了公共类,完成了组件卸载操作
3.setState
setState 使用注意事项
不能直接修改 this.state的值(比如this.state.val = 1) 因为setState 通过一个队列机制实现 state 更新.当执行 setState 时,会将需要更新的 state 合并后放入状态队列,而不会立刻更新 this.state.如果不通过setState 而直接修改 this.state 的值,那么该 state 将不会被放入状态队列中,当下次调用setState 并对状态队列进行合并时,将会忽略之前直接被修改的 state.
不能在shouldComponentUpdate 或 componentWillUpdate 方法中调用 setState, 因为这个时候setState 方法里面this._pendingStateQueue != null,则 performUpdateIfNecessary 方法就会调用 updateComponent方法进行组件更新,但 updateComponent 方法又会调用 shouldComponentUpdate 和 componentWillUpdate 方法,因此造成循环调用,导致死循环.setState 是异步的还是同步的?
以前遇到过一个问题,setState 是异步的还是同步的?在我没看深入理解React技术栈这本书之前,我会回答是异步的.因为这是工作中使用React得到的一个直观感觉.但是看完后,我只能说有时候是异步的,有时候是同步的.比如下面这个代码块的输出结果
1
2
3
4
5
6
7
8
9
10
11
12
13
14
15
16
17
18
19
20
21
22
23
24
25
26
27
28
29
30
31
32
33
import React, { Component } from 'react';

class Example extends Component {
  constructor() {
  super();
  this.state = {
    val: 0
  };
 }

  componentDidMount() {

    this.setState({val: this.state.val + 1});
    console.log(this.state.val); // 第 1 次输出

    this.setState({val: this.state.val + 1});
    console.log(this.state.val); // 第 2 次输出

    setTimeout(() => {
      this.setState({val: this.state.val + 1});
      console.log(this.state.val); // 第 3 次输出

      this.setState({val: this.state.val + 1});
      console.log(this.state.val); // 第 4 次输出
    }, 0);
  }

  render() {
    return null;
  }
}

// 输出结果是 0,0,2,3
具体原因是因为setState最终是需要通过 enqueueUpdate 更新 state, 而这里面有一个!batchingStrategy.isBatchingUpdates的条件判断来决定组件的state是直接更新还是批量更新, 而这个Boolean值是由React的一个事务机制来控制的.前两次setState的时候isBatchingUpdates为ture, 那么就进入批量更新.在setTimeout中的两setState的时候isBatchingUpdates为false(具体原因isBatchingUpdate默认值是false,setState调用栈中并没有事务修改isBatchingUpdate的值)所以就直接更新了state的值
1
2
3
4
5
6
7
8
9
10
function enqueueUpdate(component) {
  ensureInjected();
  // 如果不处于批量更新模式
  if (!batchingStrategy.isBatchingUpdates) {
    batchingStrategy.batchedUpdates(enqueueUpdate, component);
    return;
  }
  // 如果处于批量更新模式,则将该组件保存在 dirtyComponents 中
  dirtyComponents.push(component);
}
4.Ref
«深入React技术栈» 第三章