
又是一年618活动.去年买的华为云网络是真的拉跨,所以今年换了一个野机场的VPS价格公道合理,就是买了一年的结果一周没用到机器就没了。野机场果然不靠谱,最后还是买了朋友手里一个闲置的二手搬瓦工的VPS.
1. 首先需要一个域名
我是在 https://www.namesilo.com/account_home.php 这上面买的域名,买域名没啥可讲的.
2. 获取免费证书
1
2
3
4
5
6
7
8
9
10
11
12
13
14
15
16
17
18
19
20
21
22
23
24
25
26
27
28
# 安装acme.sh
curl https://get.acme.sh | sh

# 再次尝试获取证书的时候需要登录了
# acme.sh is using ZeroSSL as default CA now.
# Please update your account with an email address first.
# acme.sh --register-account -m my@ligengxin-server.top
# See: https://github.com/acmesh-official/acme.sh/wiki/ZeroSSL.com-CA
# 1. 访问账户注册页面注册一个ZeroSSL账户 传送门:https://app.zerossl.com/signup
# 2. 获取账户的EAB凭证,用来注册acme帐户 传送门:https://app.zerossl.com/developer  在这个页面里面Generate 按钮 点击就能生成 eab-kid 和 eab-hmac-key了
acme.sh --register-account --server zerossl \
        --eab-kid 你的eab-kid \
        --eab-hmac-key 你的eab-hmac-key

# 最后生成证书, 不过在这期间我遇到的问题就是使用namesilo的默认域名解析会一直 timeout ,虽然能成功但是很不稳定 推荐换成 Cloudflare 来解析域名
# 更换域名解析 https://zhuanlan.zhihu.com/p/56423186

export CF_Token=你的CF_Token \
export CF_Account_ID=你的CF_Account_ID \
export CF_Zone_ID=你的Zone_ID

acme.sh --issue --dns dns_cf -d ligengxin-server.top -d '*.ligengxin-server.top' ## ligengxin-server.top 是我买的域名

# /etc/nginx 目录下 新建ssl文件夹(安装ng后的操作) 接着就是安装证书
acme.sh --install-cert -d ligengxin-server.top \
--key-file       /etc/nginx/ssl/ligengxin-server.top.key \
--fullchain-file /etc/nginx/ssl/ligengxin-server.top.crt \
--reloadcmd     "systemctl force-reload nginx.service"
3. 安装nginx
安装ng 没啥可说的 贴下我的ng的配置吧
1
2
3
4
5
6
7
8
9
10
11
12
13
14
15
16
17
18
19
20
21
22
23
24
25
26
27
28
29
30
31
32
33
34
35
36
37
38
39
40
41
42
43
44
45
46
47
48
49
50
51
52
53
54
55
56
57
58
59
60
61
62
63
64
65
66
67
68
69
70
71
72
73
74
75
76
77
78
79
80
81
82
83
84
85
86
87
88
89
90
91
92
93
94
95
96
97
98
99
100
101
102
103
104
105
106
107
108
user www-data;
worker_processes auto;
pid /run/nginx.pid;
include /etc/nginx/modules-enabled/*.conf;

events {
	worker_connections 768;
	# multi_accept on;
}

http {

	##
	# Basic Settings
	##

	sendfile on;
	tcp_nopush on;
	tcp_nodelay on;
	keepalive_timeout 65;
	types_hash_max_size 2048;
	# server_tokens off;

	# server_names_hash_bucket_size 64;
	# server_name_in_redirect off;

	include /etc/nginx/mime.types;
	default_type application/octet-stream;

	##
	# SSL Settings
	##

	ssl_protocols TLSv1 TLSv1.1 TLSv1.2; # Dropping SSLv3, ref: POODLE
	ssl_prefer_server_ciphers on;

	##
	# Logging Settings
	##

	access_log /var/log/nginx/access.log;
	error_log /var/log/nginx/error.log;

	##
	# Gzip Settings
	##

	gzip on;

	# gzip_vary on;
	# gzip_proxied any;
	# gzip_comp_level 6;
	# gzip_buffers 16 8k;
	# gzip_http_version 1.1;
	# gzip_types text/plain text/css application/json application/javascript text/xml application/xml application/xml+rss text/javascript;

	##
	# Virtual Host Configs
	##

	include /etc/nginx/conf.d/*.conf;
	include /etc/nginx/sites-enabled/*;

	server {
		listen       80;
		server_name _;

		location / {
			return 301 https://blog.ligengxin.me/;
		}

    return 301 https://$host$request_uri;
	}

	server {
		listen 443 ssl;

    ssl_certificate /etc/nginx/ssl/ligengxin-server.top.crt;
		ssl_certificate_key /etc/nginx/ssl/ligengxin-server.top.key;

    keepalive_timeout   70;
		server_name www.ligengxin-server.top;
    server_tokens off;

		fastcgi_param   HTTPS               on;
		fastcgi_param   HTTP_SCHEME         https;

    access_log      /var/log/nginx/access.log;
		error_log       /var/log/nginx/error.log;

		location / {
			return 301 https://blog.ligengxin.me/;
		}

		location /Ours-Album {
			proxy_pass http://localhost:5000;
		}

		location /getimages {
			proxy_pass http://localhost:5001;
		}

		location /getrepoinfo {
			proxy_pass http://localhost:5002;
		}
	}
}
4. 安装docker, yarn 和mongodb镜像
1
2
3
4
5
6
7
8
9
10
11
12
13
14
15
16
17
18
19
20
21
22
23
24
25
26
27
28
29
30
31
32
33
34
35
36
37
38
# 安装docker
apt-get install apt-transport-https ca-certificates curl gnupg lsb-release
curl -fsSL https://download.docker.com/linux/debian/gpg | gpg --dearmor -o /usr/share/keyrings/docker-archive-keyring.gpg
echo \
 "deb [arch=amd64 signed-by=/usr/share/keyrings/docker-archive-keyring.gpg] https://download.docker.com/linux/debian \
  $(lsb_release -cs) stable" | tee /etc/apt/sources.list.d/docker.list > /dev/null
apt-get update && apt-get install docker-ce docker-ce-cli containerd.io

# 安装yarn
curl -sS https://dl.yarnpkg.com/debian/pubkey.gpg | apt-key add -
echo "deb https://dl.yarnpkg.com/debian/ stable main" | tee /etc/apt/sources.list.d/yarn.list
apt-get update && apt-get install yarn

# 安装 mongodb
docker pull mongo:latest # 获取mongodb镜像
docker run -p 27017:27017 -v /mongodb:/data/db --name mongodb --restart=always -d mongo --auth # 运行容器

# 进入容器
docker exec -it mongodb mongo admin
# 因为我们开启了权限验证 所以需要新建用户才能操作数据库
db.createUser({ user:'admin', pwd:'123456', roles:[ { role:'userAdminAnyDatabase', db: 'admin'}, "readWriteAnyDatabase"]});
# 创建一个可读写任何数据库的用户
db.createUser({ user:'readAndWrite', pwd:'123456', roles:[ { role:'readWrite', db: 'admin'}, "readWriteAnyDatabase"]});
# 创建一个root用户
db.createUser({ user:"root", pwd: "123456", roles: ["root"] });

# 任何地方都可以用这个方式连接db
mongo 'mongodb://{username}:{password}@{host}/?authSource=admin'

# 导出单个表(type 一般我选json)
mongoexport --uri mongodb://{username}:{password}@{host}/{database} --collection {collection} --type {type} --out {outputFilename} --authenticationDatabase admin
# 导入单个表(开启 atuh 的时候需要加上 --authenticationDatabase admin)
mongoimport --uri mongodb://{username}:{password}@{host}/{database} --collection {collection} --type {type} --file {outputFilename} --authenticationDatabase admin

# 导出整个数据库
mongodump --uri mongodb://{username}:{password}@{host}/{database} --authenticationDatabase admin
# 恢复整个数据库
mongorestore --uri mongodb://{username}:{password}@{host} --authenticationDatabase admin
5. 使用 Git Action 自动化部署项目到服务器上
我是用ssh 免密码登录的 配置完成后 你的本机应该会有私钥,服务器上会有公钥 私钥的内容放到github 的 secrets 中就行了 下面是我的一个git action 的例子
1
2
3
4
5
6
7
8
9
10
11
12
13
14
15
16
17
18
19
20
21
22
23
24
25
26
27
28
29
30
31
32
33
name: Deploy Get Images Service To Own Server

on:
  push:
    branches:
      - apis

jobs:
  build:
    runs-on: ubuntu-latest
    steps:
      - name: Upload repo to own server and build server
        uses: appleboy/ssh-action@master
        env:
          CONNECTION_URL: $ # 数据库的连接字符串
        with:
          host: $ # 你的服务器的IP
          username: $ # 你的服务器的用户名
          key: $ # 你的服务器的私钥
          envs: CONNECTION_URL
          script: | # 这段是你需要执行的命令 自定义
            if [ ! -d "./server/FetchBingDailyImage" ]; then
              cd  ./server
              git clone https://github.com/Ligengxin96/FetchBingDailyImage.git
              cd ./FetchBingDailyImage
              git checkout apis
            else
              cd  ./server/FetchBingDailyImage
              git pull
            fi
            docker stop get-images || true && docker container rm get-images || true && docker image rm get-images -f || true
            docker build -t get-images .
            docker run -e CONNECTION_URL=$CONNECTION_URL -p 5001:5001 --restart=always -d --name get-images get-images
6. 踩过的坑
- 我在ng中有如下配置, 但是我发现访问这个
/getimages总是 404.最后一顿调查发现是因为 cloudflare 中开启了代理的原因,关掉就能正常访问了
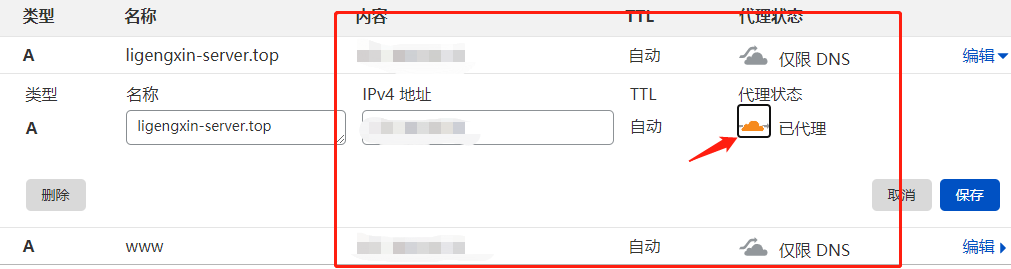
图1-1
1
2
3
location /getimages {
	proxy_pass http://localhost:5001;
}
- 后端服务发现连接不上服务器本地 docker中的 mongodb,连接字符串如下
1
mongodb://{username}:{password}@127.0.0.1/{database}?authSource=admin&retryWrites=true&w=majority
后来看了报错信息Connect mongoose failed with error: connect ECONNREFUSED 127.0.0.1:27017 看起来是IP不对, 于是我输入 docker inspect <container id> 查看了mongodb 容器在本地的IP
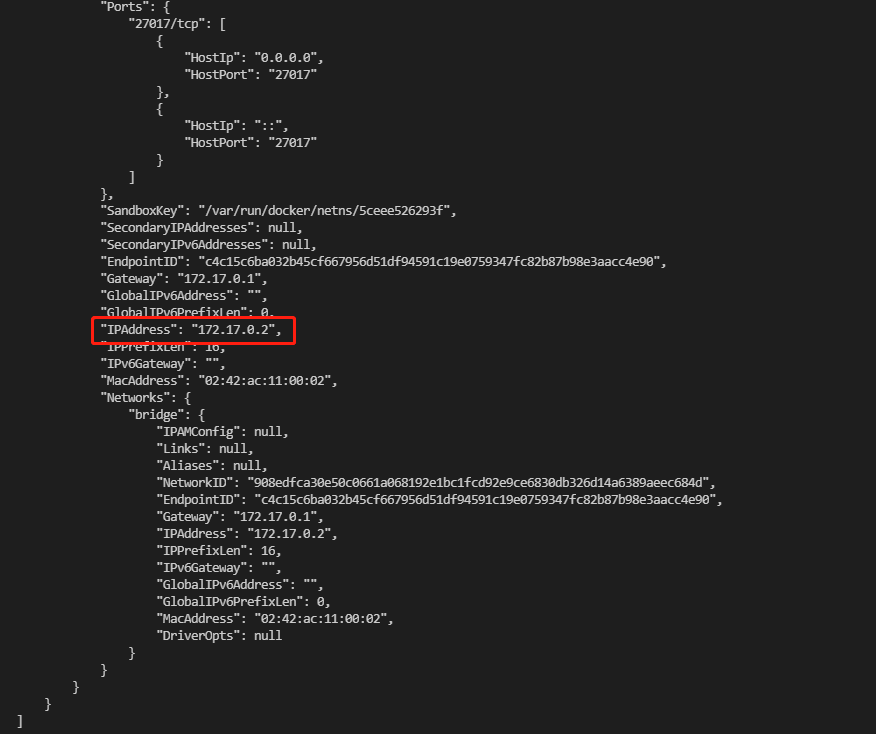
图1-2
更换下IP 成功连上mongodb
1
mongodb://{username}:{password}@172.17.0.2//{database}?authSource=admin&retryWrites=true&w=majority